Showing posts with label Christmas layout. Show all posts

Tuesday, May 9, 2017

After All the INSD Activity...

On-line crops, sales site(s) specials, you tube videos, and if you are lucky--a real physical crop!  I started on Friday, attempting (valiantly, if not successfully) to prep for an on-line crop.  Saturday morning logged in to one of my favorite FB groups and snooped about to get the gist of where to post pics, lists, when challenges would be released etc.  After that it was a flurry of paper scraps tossed on the floor, missing flair badges (still haven't turned those up, darn it), the camera battery needing recharging, and message after message just spinning by on my computer. 

So did a accomplish anything?  I mean besides needing a large glass of wine in the late hours of the evening.  Yeah!  Unlike my usual format of showing a page and then close ups of various components, I'm just going to post pages and a light description.

One More Time Challenge (using up older supplies, collections, kits or unfinished projects)... This has to be one of my all time favorite Basic Grey paper collections.  I only have pieces and strips of this and I intend to use each and every luscious piece! 


Even after purging at least half, if not more, of my papers and supplies before we moved, I still have a healthy stash of older things to work with.  So I did another entry for this same challenge!  This time I concentrated on using strips and smaller cuts of papers, not from any particular collection, just stuff that was stuck in one of my page planners from prior pages. 


And this one was a Scrap-lift Yourself Challenge...  as you can see looking at the previous layout and then down to the next one, I kind of like this little formula!  Photo on the left, title block to the immediate right, and thin coordinating strips at the top and bottom of the page.  


This next one was a Pick Your Favorite Holiday or Occasion Challenge and Christmas pages are one of my favorite things to scrap...love the colors, the kids faces, sparkly good things like ornaments, and yummies to eat.  . 


Since this post will get pretty photo heavy, I will post more pages/challenges again later.  But, the question is, would I do an online crop again?  Yes, in a heartbeat.  Would I rather attend a real, physical crop?  Well, of course.  But that's probably not going to happen down here where I live now, so online is my best bet.  And it does get me moving, I got some pages done and the challenges had me digging through some of my older photos to fulfill the specifics for the challenges, and lists of materials to use forced me into re-thinking some of my tools, and using up some of those older products! 

More next time about on-line crops and more pages I got done from this INSD!

Later,
Cheryl

Tuesday, January 3, 2017

Winter Traditions -- A Scrapook Circle Layout

For this page, I made use of pastel prints included in the November Scrapbook Circle kit.  While the kit also had some very traditional colors of the season, I did want to make good use of the pretty pastels. 


I was still enamored with more of a straight paper approach, so no watercolors, paints, mists, or even splatters.  Printed paper, tissue paper, some punched snowflakes, cute little tabs, as well as some stickers make up the layers behind the photo. 


To continue the tree theme, I used almost all the various tree stickers, placing some on either side of the photo, along with an acetate snowflake and a sprinkling of sequins. 


We also received those fuzzy mini pom poms and once they were glued onto two pieces of bakers twine, they made two cute little buntings to hang below the photo and the title. 


One more tree sticker, the be bright sticker, a couple few more sequins and a few slices of patterned paper make up the cluster at the bottom of the page.  


Two pieces of patterned paper (the same papers used to layer beneath the photo) cut into banner shapes provided a base for my title (part acetate words and part sticker!).  Adding sequins and the other little pom pom bunting piece kind of finished this area of the page.


Once I added the scribbly outlining and my journaling, the page was complete!

The pastels worked I think because our Miss Bella was wearing a lavender and aqua coat, had aqua, turquoise and pink in her hat and Mr. Jackson was wearing mostly neutrals.  Adding that one little Beautiful and Bright sticker picked up on his dark jacket.  There you have it, my take on a traditional subject done in non-traditional pastel colors.

So be traditional, in a non-traditional sort of way~ 

best,
Cheryl


Tuesday, December 27, 2016

Choosing a Kit Club - Pure Scrapbooking

Ah, touches of traditional deep green and red, wood grain print papers, and splashes of snowflakes... a much more straightforward holiday page.  Lately I've been using a lot of plain white cardstock for my backgrounds, adding color by way of banners and photo layers, watercolors and mists.  So here I opted to use two of the papers as my background and a cheery red and white candy cane striped branding strip along the seam. 


Papers and goodies are from the November Scrapbook Circle kit.  The kit provided an entire pack of acetate embellishments; here I used the gifts and the mistletoe. Also included was a package of washi strips and I made use of several of them by tearing them and placing them at the top corner of the page and repeating them along the candy cane seam.  The washi strips also provided the wording on the red and green labels (also included in the kit). 


About the only thing I went outside the kit  for was the Thickers alpha, the doily and ribbon, and the punched snowflakes.  It's always kind of nice to be able to create your entire page from the main kit!  


I used two more of the labels among the paper layers under the photo, tucked in some tabs,a few punched snowflakes for a punch of white and tied on a scrap of dotted swiss sheer ribbon above the mistletoe acetate.

This is something Scrapbook Circle does exceedingly well. They provide ample embellishments, their section of papers always seems to allow for both feminine and more masculine pages; or in this case pastel holiday pages and a more traditional take.  Love this!  


No paints, mists, texture paste... just straight scrapbooking!  It was a good day, Elfie says so!

 happy scrappin'
Cheryl


Saturday, December 24, 2016

Choosing a Kit Club - Problem Colors?

Oh!  Let's do have a small chat about holiday papers and kit clubs, so grab a cup of tea or mug of hot chocolate and come sit a spell with me, whilst I prattle on about your/our choices (or lack there-of) in holiday goodies and kit clubs! 


Before this begins to sound like nothing more than whining...the thing with kit clubs is...  you give your decision making choices over to those developing the kits. And you have to decide up front if this is ok with you.  For the most part I am having fun with this...kind of like getting a surprise every month!  


I must confess, my taste runs more to the traditional side when it comes to holiday themed papers.  And while I don't care for bright, kelly greens and fire engine reds; I do like touches of the old red and green.  So when I perused almost all of the kit clubs various offerings for the month of November, what did I see?  Lots of pastels...  lots and lots of pastels in each and every club.  And this can be pretty, but I do wish there was more to choose from between the clubs.  A bit of red and green and metallic golds for us more traditional types.   

The good news for me in getting things that are say not my normal choice, is that it forces me out of my comfort zone.  It can lead to a more creative take on what might otherwise be just a standard page.  Nothing wrong with that!!!  And everything right!!!


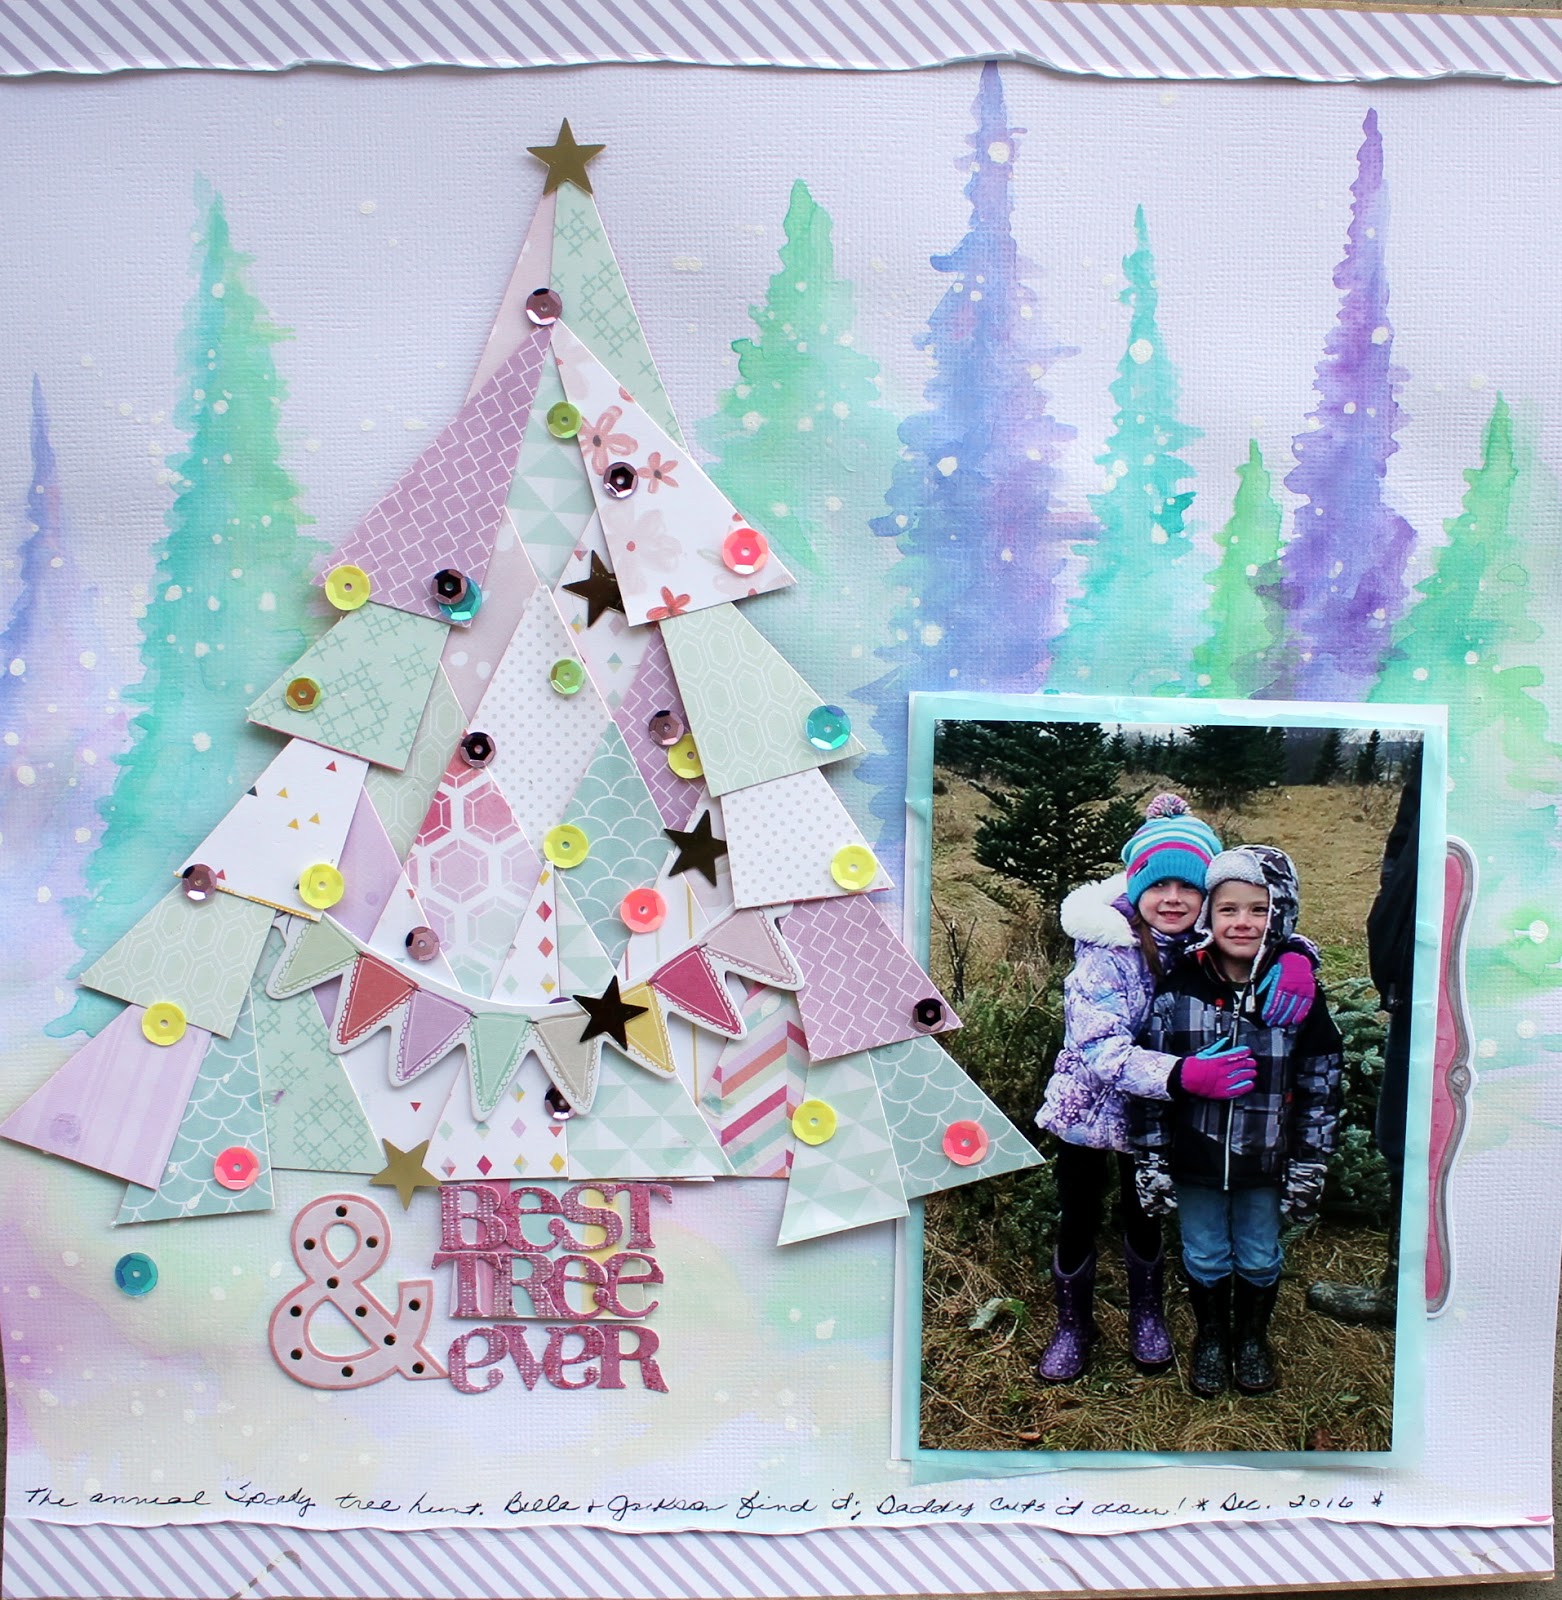
I started this page thinking about how to construct a tree out of the various squares printed on one of the papers in my December Hip Kit.  After cutting the squares into triangles and reassembling in the shape of a tree...it looked a bit too quilted and structured, so I used the little sliced off pieces from cutting the squares into triangles and tucked them in along the outside edges of the tree.  Ah, much better, don't you think? 


The tree was assembled before the background was done, so I could put it down and pick it up while I was painting the trees.  Just watercolors and some white mist or watered down craft paint dripped about to create snow.   

While the background was drying, I starting "decorating" my tree with sequins and the little die cut banner (included  in the kit) and layered up some tissue paper and patterned paper under my photo. 


With the background dry,  the tree could be adhered to the page with pop dots and the photo slid in under one of the "boughs", and the title formed the tree trunk!  I did wind up using an older Basic Grey alpha set just because the colors went so well (and it is truly time to use up this older stash stuff!). 

Even with all the pastel papers, and even if your taste runs to the more traditional, using a kit club might just inspire (or push you a bit) to a new creative look for what other wise might have been a more um, predictable layout! 


Let's have a cup of cheer and a little unpredictability!!! 

best to all!
Cheryl

Saturday, December 10, 2016

Creating Joy - How to Coordinate Kit Club Papers

So, a little off the topic of how to choose a kit club, but important anyway.  Let's say you've chosen a kit club and you can't afford to buy the add-ons each month, AND you get a kit that although you love the papers, they are just not playing nice with each other! 

You can always use little pieces as I did on the "About You" page, but this time the papers all "individually" went with my photo; it just too much of same size prints, too much of just one color... 

I chose to cut the papers into two inch squares and quilt them together. 


 My original intent was to actually sew the squares down.  But my little sewing machine threw a hissy fit; and I need to wind a new bobbin and change the (now bent) needle.  Just do not have the patience right now to do that, so I moved on and decided to outline each square. 


See I loved these papers and they do well together, so now I am thinking forward on more ways to put them together.  It's funny how things work out, huh?! 


I crumpled some plain white cardstock and used some flat white cardstock, as well as a piece of the corrugated red that came in the kit; tucked in part of a doily, a couple of the tabs (also included) and a few silvery die cut pine srigs (I cut those). 


The Joy title was cut from the papers, and just to make the squares a little more interesting, I used several more of the included tabs and pretty much called it done. 

This has been a fun page to make, but now I have to go wrangle up a new needle, and fight with a little pink sewing machine (LOL)! 

best,
Cheryl

Wednesday, March 18, 2015

Working Around Holiday Colors!

My grandkids are infamous (ok only infamous in my mind) for dressing in non-holiday coordinating colors during said holiday.  Hot pink during Halloween, magenta and orange during Easter, and this (an older photo series of my now 19 year old grandson) holding up a bright yellow vest received at Christmas. 

Sometimes I can just ignore the colors and go with the standard holiday color combos.  Sometimes, I make the layout about something other than the holiday during which the photo(s) were taken.  But sometimes (blast it all),  I really want those non-coordinating photos, just as they are and on a page about whatever the holiday is/was.  So there (she says, stamping her foot and pouting.) 


So here is grandson No. 1 holding up his very bright yellow vest... and I wanted this done as a Christmas page. 

It was that clear, bright yellow that threw me off.  I am forever scrapping things that are years old.  But I have a few Christmas photos that have never found a home due to the colors that people are wearing (or holding...).  This time, I used a white and beige-y print background page and chose papers (scraps) from an old My Mind's Eye Christmas collection that had a yellow tone to them.  Plus, the red that is printed on the papers is a subdued red.

While I am not excited, jumping up and down over the page,  I am not displeased with it.  The only thing right now that may still change is the title.  The red is also subdued, but the dotty pattern on top of the print is kind of a bit much.  But I'll let it be for a few days and look at it again.  Sometimes that clears things up for me.  Just to walk away and re-visit. 

Papers are all My Mind's Eye, tabs are from Basic Grey (25th and Pine) and the border pieces are all from a K&Co. pack that I am on a mission to use up. 


Sunday, March 15, 2015

Turning That Stash into Christmas Pages (yes still)

Yep, still scrapping the stash and yep, still scrapping another Christmas page! 


The story (in Reader's Digest form):  between the two of us, we have been laid off for several years (cumulatively) and since money was so tight, I would not spend it on a Christmas tree when it was going to be hard enough to do gifts for children and grandchildren.  (We have not had an artificial tree for probably 20 years---one of husband's bug-a-boos.) But this year, even with money being tight, he went out and came home with a tree. 

You know what? Going without one for several years, really made this one so much more beautiful to me.  I left it up longer than we ever had in the past.  I just enjoyed it being lit up every night for as long as I could. 

Used papers from the Pink Paislee Snow Village pad again, except for the white distressed background paper--that's the B side of an Authentique paper (again from a pad, the one I used so much of on my eldest grandson's graduation album).  The "happy" title is a Doodlebug sticker (from the set that I forgot I had -- for um, like y-e-a-r-s).  The wood veneer snowflakes are from Michael's (got them on clearance last November and there are only a couple left--so those have been well used!).  The only other embellishments are really the sequins and the tissue paper.  And even those items have been repurposed from my sewing box and the gift wrap box! 

I am finding that not having nearly the stash of scrappy supplies that I used to has made me appreciate the supplies I have on hand even more...just like with the Christmas tree.  I don't need racks and stacks of paper; it is far less overwhelming now to select papers and embellishments.  And I think I may even love these pages more than ever! 

have yourself a scrappy good day,
use up some of that stash,
you'll be glad you did!

Cheryl


Tuesday, March 3, 2015

Scrapping the Christmas Stash!

Just a quick post...  Jackson was so patient and contemplative about opening his gifts.  And check out those eyelashes!  I just love a photo of a child with their eyes cast down, intent on whatever they are doing. 


Really wanted this page to have a light and airy look, rather than the usual Christmas colors, so I went with whites.  There's a lot of older product that got used on this page!  The white tone on tone polka dot background paper is super old Heidi Swapp.  It was part of a resist line that was intended to be used with inks, mists, paints.  After applying the color and wiping it off, the polka dots ( in this case) would have remained white.  But on this page, I just wanted the white on white look. 

After trimming the polka dot paper down, it got centered on a beige-y gray snowflake patterned paper (from Pink Paislee--Snow Village pad).  Then tissue paper and pieces of a music patterned paper (also from the Pink Paislee--Snow Village pad), a doily and a gray and white chevron were used as layers under the photos.  And old?  That title "believe" is also ancient...a sparkly pretty sticker from Doodlebug.  I've been hoarding this set of stickers for so long, I forgot I had them! 

For embellishment, I added a couple of wood veneer snowflakes, some gold and white sequins, and two small white paper flowers (that just happened to be sitting on the corner of my desk). 

As much as I love all the new papers and goodies that are out there...I am almost as excited to dig into my stash of papers and stickers and be able to put together a page that looks as up to date as if I had bought a bunch of new supplies. 

I'm certainly not advocating we all quit purchasing scrapbook supplies!  But what I am advocating is:  if you bought it, use it! 

best,
Cheryl

Saturday, February 28, 2015

Still Christmas at My House = Another Christmas Page!

So, yeah.  I am still scrapping Christmas.  I do not scrap chronologically, at all.  If you've read my blog before, you know I jump from years and years (and years) ago to current photos with no real rhyme or reason.  It just depends on what appeals to me at the moment.  So I go with it. 


This page is again about our Christmas cookie baking adventures.  I love to get the grandkids involved.  They "helped" roll the Chocolate Crinkle cookies in powdered sugar, hence the white hands!  And you know what, they did a really good job!!  I so want them to remember these times spent together.  I want to remember the look on Jackson's face when he came into the kitchen, saw his sister helping to roll the chocolate cookies into little balls and proclaimed he could help too.  Until he saw his sisters hands all covered in sticky chocolate dough.  Then he wrinkled his face up and said... "Oh, no.  I don' wanna do tha-a-t.  She's all doo-ty."  So we switched to rolling the cookies in powdered sugar. 

The page is a mish mash of Echo Park (the background sheet), Pink Paislee holiday pad (the stripes used to border the page and for the layers under the photos), and Crate (the large cluster of ephemera to the side of the photos).  I had made a bunch of these cluster things several months ago (see my October 25 post http://cheryl-husmann.blogspot.com/2014_10_01_archive.html ) after watching a video where this gal went through a pile of scraps and packaged ephemera, stapled little stacks of it together. 

Tucked in a piece of a doily, added a tab at the top of the photo block, and my title and journaling.   Oh, yeah...and sequins!!!   It's a Christmas layout...gotta add some sparkle! 

sparkle on everyone!
Cheryl

Monday, February 23, 2015

Are You Still Scrapping Christmas? Me Too! - 19 Kinds of Cookies

My daughter and I get together every year for a weekend baking extravaganza.  This year, since there is a long distance move coming up, we really pulled out all the stops and baked over two weekends.  My son came along and man, oh man, with three of us, we really went to town!  19 kinds of cookies! 


I wanted to document this, because the annual cookie baking weekend has become a part of our Christmas tradition.  And even if I am not here, but across country...I know the tradition will go on. 

To mimic the colors of the cookies, frosting and decorative candies, I chose several papers from a Pink Paislee holiday pad to work with.  Trimmed down a soft green tone on tone pattern and centered it on a pink and red diagonal mini stripe paper.  Since my photos were pretty busy, I didn't layer them at all, but chose instead to use the other papers I had chosen in small irregularly cut strips at the top and bottom of the page.  After that it was just a matter of picking out the right spots for some embellishment clusters. All the embellishments (except for the white paper doily and the red crocheted doily) are from Basic Grey's 25th and Pine collection.   The 25th and Pine stuff really seemed to coordinate quite nicely with the Pink Paislee papers, so I will definitely be using them together again (Lord knows I have an ample supply of Christmas photos to scrap yet!!) 

The title is made up of red foil Thickers and an older alpha set from Basic Grey--not sure, but I think it from their Wassail line of several years ago.  No journaling, but there is a list of the cookies on the back of the page. 

One of the things I really want to do is to make a Holiday Cookie recipe book for the family of all of our favorite cookies and holiday treats.  It's on my bucket list of scrappy things to do!! 

yep, still working on Christmas stuff... 
Cheryl

Tuesday, January 27, 2015

Sweater Weather Layout #5 - Favorite Holiday Memories

So here's the fifth layout I've created using just the main Sweater Weather kit from Scraptastic.  I've had such a good time trying to work from just the kit (pretty much).  It's good to have a challenge, a scrapbooking challenge that is! 


This time the items from my stash are sequins, white cardstock (for the circle punches),  the light gray cardstock (used as a base for the page), a doily, the journaling card and the baker's twine. 

The page background was inspired by a Simple Stories Christmas paper I saw Mercy Tiara use in one of her you tube videos.  It had printed circles, sequin shapes, and snowflakes scattered across the middle portion of the paper and I just loved that paper.  So I thought I might be able to use real sequins, some circle punches and snowflake stamps to mimic that paper design.  Now mine does not look at all the same, but I think I like it!  I did decide to add some white paint drops here and there after I was done stamping and gluing down the circles and just a few red punched snowflakes.  Really wanted to include the journaling card because that wood grain border so goes with the wood grain paper.  Then I decided to just use the title on the journaling card as the page title because every alpha set I laid on the page just took away from the overall light feeling of the page. 

The look on my little Bella's face only speaks a bit about how goofy she got over this musical and light up elf hat.  She was just beside herself with glee over this thing (course it probably didn't help that we had been baking cookies all day and sugar may have been involved...). 

So, there you have it.  Layout #5. 

to be continued,
Cheryl

Monday, January 19, 2015

Sweater Weather Layout #2 - Most Wonderful Time of Year

And here is my second take with the Scraptastic's Sweater Weather kit. 


With Bella's bright blue and purple winter coat...I decided on a white background and to focus on the green of the tree.   Then centered the white on an olive-y green piece of cardstock.   I used a deconstructed style layout, placing my photo down and arranging embellishments (stickers) around the photo.  I really wanted to use that old truck sticker and that was the other reason for choosing a white background (one of my bug-a-boos---I really dislike white borders around the edges of stickers--don't know why--it just bugs me).  By placing the truck sticker on the white background, that white border kind of blends into the background paper; same for the arrow stickers.  I placed both the "wonderful time of year" and "tree farm" stickers on cardstock to repeat the green and charcoal colors, added some outlining, some green and black paint splatters (of which a few splatters ended up where I didn't want them---so I covered those up with those cute little snowflake circle stickers). 

Everything except the cardstock, the baker's twine and the little red circle tab came from the kit! 

best,
Cheryl

Sunday, January 18, 2015

Some of My Favorite Ornaments

I thought it might be fun to see how many layouts I can get out of the Sweater Weather kit I won from Scraptastic and Mercy Tiara.  I've been lusting after a membership to one of the several really good scrapping kit clubs there are. And Scraptastic is definitely on the list (I kind of like that there is a choice between two  main kits each month).   But I simply have to wait until the house is sold and we are moved and settled.  Anyway this will be kind of a test for myself to see how far I can go with a kit. 

Here we go... Sweater Weather layout #1...


I used a piece of my own white cardstock, some layers of white tissue paper.  The stitched banners are from my stash (Basic Grey's 25th and Pine collection), as is the twine.   I absolutely love the Studio Tekturek white on white bokah kind of  print (Peachy Christmas #08) and the My Mind's Eye woodgrain that came in this kit.  So, to make it last a little longer, I just used strips of them,  Tore the edges of the white bokah and punched one of the strips of the woodgrain, but left the other a really thin little sliver for the top of the page. The alpha stickers from Bo Bunny are perfect with these papers, but I did also use the red Tiny Type from my stash.  The Merry Everything sticker and the red heart are from the sticker sheet that was included (Warm & Cozy from Carta Bella).  Although I did punch two of the stars from the woodgrain deer sticker that is on the sheet, since I just don't see myself using that one.   The red enamel dots came in the kit, as did the snowman flair badge. A minimal but of journaling and some penned in stitch lines and I called it done. 

This was fun!  And even though the stickers all kind of scream winter, snow and Christmas...  I see lots of other uses for the papers themselves.  There's a bit of a red, white and blue thing going on that has me wondering if I have any 4th of July photos filed away.... h-m-m-m

have a scrappy good day all,
Cheryl